

Ever since we built our track systems at our stable in Snohomish, Washington, I’ve been on a mission to create a comfortable, mud-free home space for them to get out of the rain. The Pacific Northwest is known for its rain, and our mares were good at taking shelter in the trees, but I wanted to give them some additional options to stay dry. I didn’t have a lot of time to complete this project before fall, so I didn’t want a kit that I would have to assemble, and I couldn’t afford to hire contractors to come in and build something fancy from scratch. I wanted a solid shelter that could be moved into place in my pasture and a mud management solution that wouldn’t cost a fortune or require heavy equipment. Here’s how I got it all done in a single weekend.
Why I Chose a Palouse Ranches Shelter
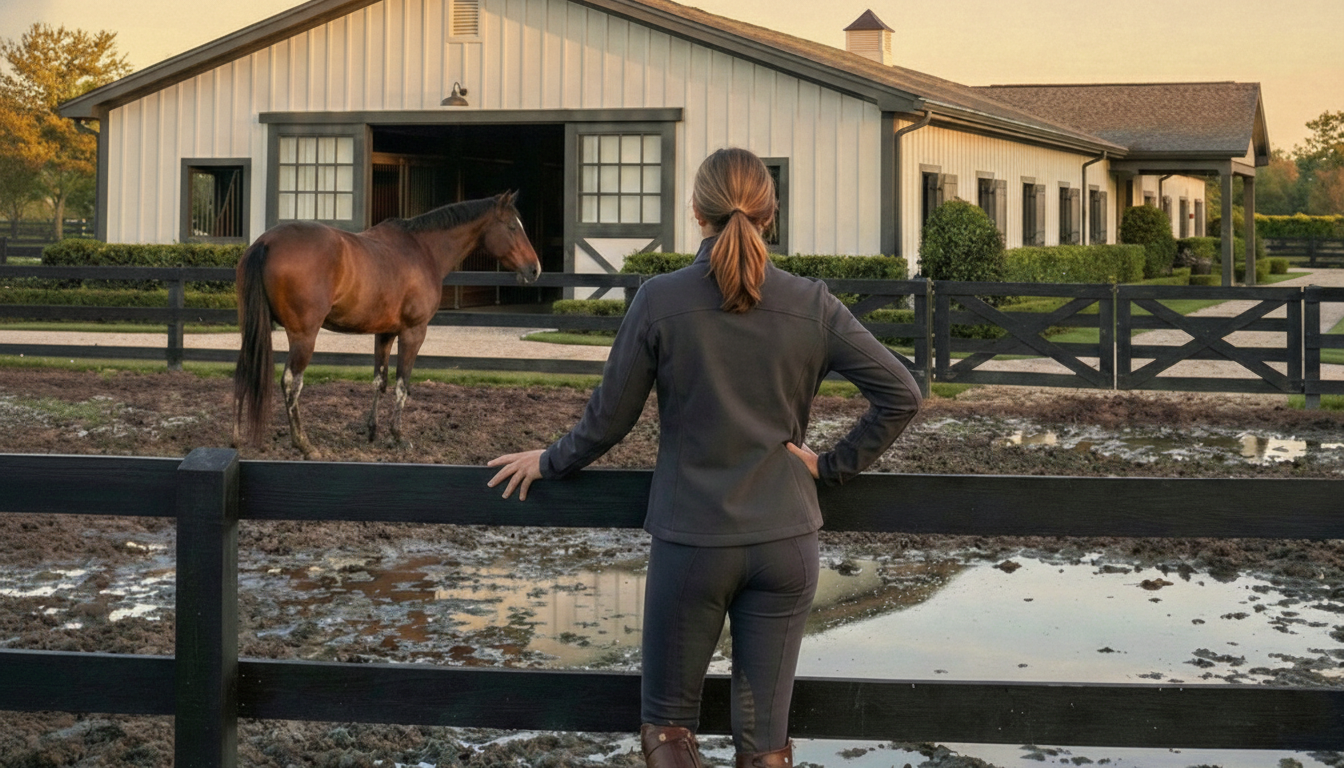
I spent weeks researching before my friend told me she got her pasture shelter from Palouse Ranches, a family-run company in Washington that specializes in permanent portable livestock shelters. Their shelters are fully assembled and delivered ready-to-use across the Western US, which means no fumbling with kits or sacrificing my entire vacation to carpentry. I settled on their Pasture King Shed, which is essentially a one-sided pasture shelter with customizable length and height. According to Palouse’s site, these loafing sheds are 10 feet deep, and you can choose lengths from 12 to 36 feet and three roof heights (Lowline 6’7”, Standard 8’7” and Draft 9’3”). That depth is perfect for keeping rain and wind off my horses without making the structure too cumbersome to move.

Palouse builds its shelters on 2-7/8-inch heavy-duty recycled oil-pipe skids and states that any of their ranch collection shelters can be towed around the pasture with a tractor or ¾-ton pickup and come with a five-year frame warranty. The frames, roof joists and skids are made from schedule-80 pipe, and the siding is kiln-dried Douglas-fir with a tongue-and-groove design. They also use a unique pocket system that holds boards in place yet allows them to flex when you move the building; if a board gets damaged, you can slide it out and replace it. The roofs are covered in 29-gauge Galvalume metal that sheds rain and snow easily. Since I did not want to have to redo or repair these shelter next year, these details gave me confidence.
I opted for the standard height (8’7” at the peak, 7 foot back wall) because it offers good clearance for my quarter horses and still fits under low hanging branches. Palouse’s Pasture King models are an economical option if you only need a windbreak; and, in my case I preferred this because I didn’t want any of my lower-on-the-totem-pole mares to get trapped in there if the boss mare came barreling in. Knowing that these shelters are fully welded and shipped in one piece meant I could schedule a single delivery and start using it right away.
Delivery Day: Getting a 20-ft Shelter Into Place
Palouse Ranches delivered the shelter on a sunny afternoon. The driver backed the flatbed into a field by our parking area and used a very slick technique to slide the shelter off the trailer. The building sits on skids, so we can relocate it later if needed, but the Palouse Ranches delivery came with a piece of equipment called a mule, which allowed the delivery driver to move it anywhere with wheels under one end. He requires a 14’ gate width and was able to maneuver the shelter around some tight turns and over some rough terrain to get it into place on the Lighthoof pad I had built at the very back of the track system.

Within an hour the shelter was in place and ready for horses. The pocket-system siding was able to flex slightly during towing and settle back perfectly. There’s a bit of natural variation in the Douglas-fir boards—Palouse notes that minor blemishes or cracking are normal and don’t affect the structure—so I plan to stain the wood later this fall. For now, the fresh fir smells wonderful and the galvanized roof looks like it will handle our winter snow load.
Tackling the Mud: Researching Lighthoof Panels
A new shelter doesn’t solve the mud problem if horses churn up the ground under it. I needed something durable underfoot, so I turned to Lighthoof Equine Mud Management Panels. Lighthoof makes flexible geocell panels specifically designed for horses. Each panel is 6 feet wide and 12 feet long with 3-inch-tall cells roughly 5.5 inches in diameter. Panels weigh about 24 pounds each and are DIY-friendly with minimal base prep. With over 14 years in business, Lighthoof is the only geocell product specifically engineered and patented for equine use, designed to encourage drainage and reduce erosion. Flexible plastic strips are welded into hundreds of fist-sized cells so the panel conforms to uneven ground, preventing frost heave and cracks. Once filled with compacted gravel, the cells are strong enough to support draft horses, tractors, and trucks.
What convinces most people to order Lighthoof is how simple the installation is. Unlike rigid plastic grids that require deep excavation and a gravel sub-base, Lighthoof panels can be installed directly over existing mud. You can also trim the panels with scissors to fit around fence posts or into odd shapes, and 40 heavy-duty zip ties are included to join sections. Lighthoof panels raise your horse 3 inches above the mud, protect and preserve your gravel, and create a safe, non-slippery surface. Lighthoof even provides a ten-year warranty and notes that the high-density polyethylene is certified by the EPA to last at least 70 years.
Shipping Logistics
One aspect I appreciate is Lighthoof’s easy and transparent shipping policy. Free shipping is included for all quantities within the continental United States. Orders of ten or fewer panels ship within two business days via UPS Ground. Larger orders ship via freight and may take several weeks to arrive from Houston, TX (made in the USA!), especially to remote regions like Washington or New England. The company recommends having someone on-site to sign for freight deliveries and notes that panels may be unloaded on the roadside if a full-size tractor-trailer can’t access your farm.
Installing the Panels Under the New Shelter
I ordered the 4-panel bundle, which is discounted and comes with enough 6-oz non-woven geotextile fabric for the full installation. Lighthoof’s installation guide emphasizes selecting the correct gravel—⅜-inch or ¼-inch minus crushed stone with fines for compaction. Using sand or pea gravel within the cells won't provide enough stability and can cause the panels to shift, and horses may pull them up – however, sand or pea gravel may be used over the top once the cells are locked into place with the angular gravel. They also emphasize the importance of edge protection; every side of the panel grid must be contained by either being set into the ground or framed with timbers.
Step-by-Step
- Site prep: I somewhat leveled the topsoil where I wanted to put the shelter, so it would sit flat, and laid down the geotextile fabric to separate the gravel from the mud. The fabric helps prevent gravel from disappearing into the dirt and saves your gravel money during installation.
- Lay panels: We stretched out the Lighthoof panels and expanded them to full length, trimming the ends to fit the shelter footprint. Using the supplied zip ties, we connected adjacent cells so the grid acted as one continuous sheet.
- Edge framing: To create edge protection, we installed pressure-treated 4 × 6 timbers around the perimeter. This frame prevents horses from tugging at or stepping on exposed edges and gives the gravel something to compact against.
- Fill with gravel: We poured ⅜-inch – ⅝-inch minus gravel over the panels, overfilling by 1–2 inches, then rented a vibrating plate compactor from a local hardware store. Lighthoof notes that using a hand tamper or simply driving over the gravel will not compact it adequately. After the first compaction pass, we added more gravel and compacted again until we could see the outline of the cells.
- Finishing touches: Finally, we added a light layer of gravel to cover the cells completely and raked it smooth. The result was a firm, level surface for the inside of the shelter.
From start to finish, installation took about four hours. I had some help with raking from my husband and son, but I was able to do the rest by myself. The hardest part was moving the 3,500 pounds of gravel (each panel uses about 1.5 cubic yards) – thank goodness for tractors!! and handling the compactor, but the process was straightforward thanks to Lighthoof’s detailed guide. Proper installation matters—Lighthoof warns that skipping steps like edge protection or using the wrong gravel can result in panels moving or lifting. But it’s easy to get right and thousands of horse owners have had success, so I knew I could!
NOTE: I created a pad with the Lighthoof, first for the shelter to be placed on. But you could also install it inside an existing shelter if you already have a shelter that needs mud control.
Results and Takeaways
The next morning, heavy rain gave us a perfect test. The area inside and immediately outside the shelter stayed dry and firm, while the surrounding paddock was slicker than snot! My horses walked into the new run-in without hesitation and stood comfortably on the gravel-filled cells. Since the panels raise them above the mud and provide a stable surface, I’ve noticed they seek it out even before the shelter was delivered. Cleaning the shelter is easier because manure sits on top of the gravel instead of being churned into mud.
I even drove the tractor right onto the Lighthoof pad to unload the gravel and was thrilled that the ground didn’t rut or sink. Lighthoof emphasizes that once filled with gravel, the panels can support trucks and tractors, and they were right.
Personal Reflections
This project reminded me that investing in quality materials pays off. The Palouse Ranches shelter cost more than something like a Shelter Logic kit, but having it delivered fully assembled saved days of work. Knowing it’s built from heavy-duty pipe and seasoned lumber gives me peace of mind when winter storms roll in. Lighthoof panels for this size area were less than $1k, and they protect my gravel investment, reduce maintenance, and improve hoof health—plus they come with the peace of mind of over a decade in the field with real horses. Completing the entire project in one weekend was only possible because both companies designed products that were both easy to install and high-quality, long-term solutions.
Tips for Fellow Horse Owners
- Choose the right spot: Pick a spot for your shelter with access for delivery, convenience for cleaning and feeding, and places for water to run to as it runs off the roof of your shelter.
- Invest in proper gravel: Use small, angular crushed stone with fines (3/8” or ¼” minus) as recommended. Washed or rounded gravel will not compact and will cause failure.
- Frame your installation: Don’t skip edge protection. Timbers or existing buildings provide the rigid border needed, or install the panels up to the edge of a fence or shelter wall to keep the outer edge of the panels from getting caught by hooves.
- Compact thoroughly: Rent a vibrating plate compactor and take your time. Compacting in lifts ensures that the gravel locks into the cells. If it’s not fully compacted, it will settle over time, and you will need to add more gravel to top it off.
- Plan for delivery: Palouse delivers fully assembled shelters exactly where you need them across much of the Western US; make sure your location meets their minimum access requirements. Lighthoof ships up to 12 panels via UPS, but larger orders arrive on a freight truck that may need room to turn around.
Final Thoughts
Completing this project in a single weekend felt empowering. My horses now have a dry, comfortable shelter that can be relocated if needed, and the ground under it stays stable no matter how much it rains. Palouse Ranches and Lighthoof both produce products designed by horse people for horse people, and it shows. For anyone tired of slogging through mud or dealing with flimsy shelters, I can’t recommend this combination enough.

Leave a comment
This site is protected by hCaptcha and the hCaptcha Privacy Policy and Terms of Service apply.