
Common Lighthoof Mistakes—and How to Avoid Them
It’s the rare call we dread receiving here at Lighthoof HQ – “my Lighthoof isn’t what I expected”. While most companies will try to sweep these unpleasant occasions under the rug – we want to talk about them. The only way to prevent failures or disappointment is to show why we believe each step of our installation process is critical to the long-term success of your product. We want you to have a fantastic experience with your Lighthoof!
99% of the time the installation has failed because the installation instructions were not followed.
We have thousands of successful installations across the USA. Customers consistently find the product exceeds their expectations when installed correctly.
We promise – the steps that we outline are for a reason. We have single women in their 70s that have proudly completed DIY projects. It’s a very straightforward installation process – but the instructions need to be followed. Here are the most common issues we have heard over the past 10 years.
Why the Right Gravel Matters for Lighthoof

If a highly compactible, angular, crushed stone with fines is not used with Lighthoof the horses WILL pull up the panels.
We are lifelong horsemen. We promise – if the 3/8” minus gravel was not an ideal surface for dry lots, we would not use it on our own farms. The gravel compacts tightly, forming an extremely flat surface that both farriers and veterinarians find improves the hoof health of the horses. Washed gravel does not contain fines. The stone dust (minus) is what fills in the gaps when compacting, creating a firm surface.
If the gravel cannot compact, it will get pulled up.
Additionally, driveway stone is generally ¾” and can cause stone bruising and abscess. We only recommend gravel ½” and smaller for hoof health. Unfortunately, when the incorrect gravel is used, the only remedy is to remove the panels, scrape away the incorrect material and start again. Generally, the panels are easily salvaged, as there is nothing holding them in place.
“I was in a hurry and didn’t put a border around the panels – now my horses have pulled it up.”
Edge protection is super important for the long term stability of your investment. If edges are exposed, horses may become curious and begin to tug at the corners, lifting the panels.
Additionally, without the edge there is no firm end for the gravel to compact into at the termination. This may cause the edges to get walked down over time. If you go the route of the surface installation (which a majority of our customers do), please trust us that your horses can easily manage the 4” step up of a framed installation.
You can backfill dirt or gravel up to the edge of the timbers if needed – but honestly, we just don’t find it is needed. At Lighthoof HQ we use railroad ties to terminate with no backfilling. Horses of all ages navigate these paddocks with ease.
“I figured driving my tractor over the gravel would compact it –now my horses have pulled it up.”

Tamping by hand, driving over it with a tractor or lawn roller is NOT going to compact 5” of loose gravel down to the 3” of the cells.
Nearly every failed installation neglected to use a vibrating plate compactor.
Most Home Depot locations have an equipment rental section. You can rent a compactor for half or full days. Overfill your panels by 1-2”. Compact until you see the outline of the panels. Add another 1” of gravel. Compact again.
Pay attention and get all the way to the edges and corners. Then add your loose layer. You will be happy you did.
*Note – this installation also did not zip tie every cell together allowing the horses easy access to the edge.
“I didn’t want to zip tie every cell together – but now there are gaps where the edges are coming up.”

We supply 40 zip ties for every Lighthoof panel. This is to ensure that no matter what configuration you want to make for your layout, every cell can be zip tied to the adjacent cell.
This forms one continuous mat, preventing gapping. Large gaps between panels act as unsupported edges and the panels can lift or become uncovered.
Zip tying middle areas can be made easier by using small sections of plywood as kneeling boards (yes – your unfilled panels will support you walking on them if covered by a sheet of plywood or OSB!)

“I had more length than I needed so I just collapsed the extra part of the panel – but now the edges are coming up”
If you have extra length, cut it off. Please do not wad up the edges of the panels. Nature acts on these collapsed edges by pushing them to the surface over time.
The cells need to be nice and open in that diamond pattern to accept the gravel and compact.
For the most secure edges, our top installer uses sheet metal roofing screws to affix each cell of the panels to the edges of any border timbers. This keeps those edges firmly buried. This is a completely optional step – but one that has proven to deter even the most curious ponies.
“I installed in a low spot and water is pooling.”

This actually is not a failure of the Lighthoof panels. It is performing exactly as it should – providing a firm, mud free surface even underwater.
Lighthoof cannot change the nature of water – it will always run downhill, seeking the lowest spot. Water can still collect in those areas. However – you will not have mud.
It is for this reason we suggest addressing any changes to grade before installing your panels. Lighthoof will lock in the lay of the land, making adjustments after the fact much more challenging. If you need to prevent pooling water on your panels, consider installing on the surface and creating an “island”. Water will still pool around the panels, but you will have a dry oasis!
At the end of the day we want you to have the perfect Lighthoof installation. Please take the time to read our instructions, watch the videos and please call with any questions. Our staff members are often available nights and weekends to take your call – and you can even text us at the 800 number!

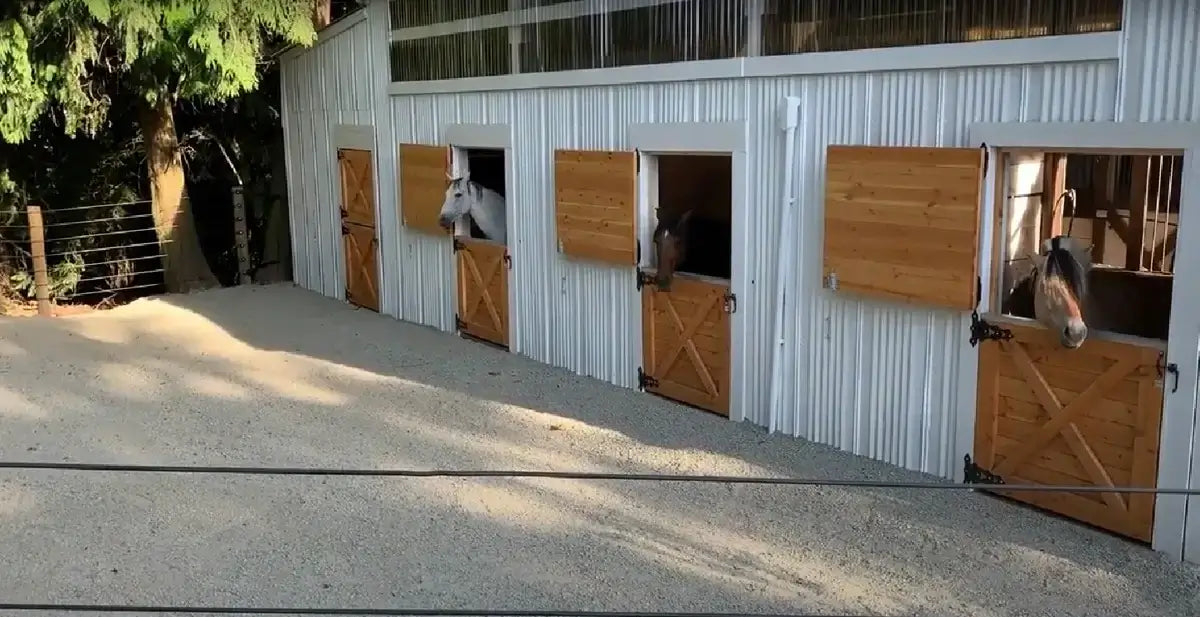
In closing, let’s look at a picture perfect installation at Lighthoof HQ in Washington. Heavy duty, non-woven geotextile fabric beneath. Every cell zip tied with the tails tucked under the panels. Every cell stretched to a uniform, diamond pattern. Panel edges tightly against border timbers (in this case they were screwed to the railroad ties). Panels cut around fence posts and zip tied on the other side. Panels are also screwed to the posts for extra security. Stone is a 3/8” minus. When compacting this contractor compacted 3 times total – including a final compaction of the loose layer on top to “set” the stone.
Follow our guide and you will be mud free – forever!

Leave a comment
This site is protected by hCaptcha and the hCaptcha Privacy Policy and Terms of Service apply.