
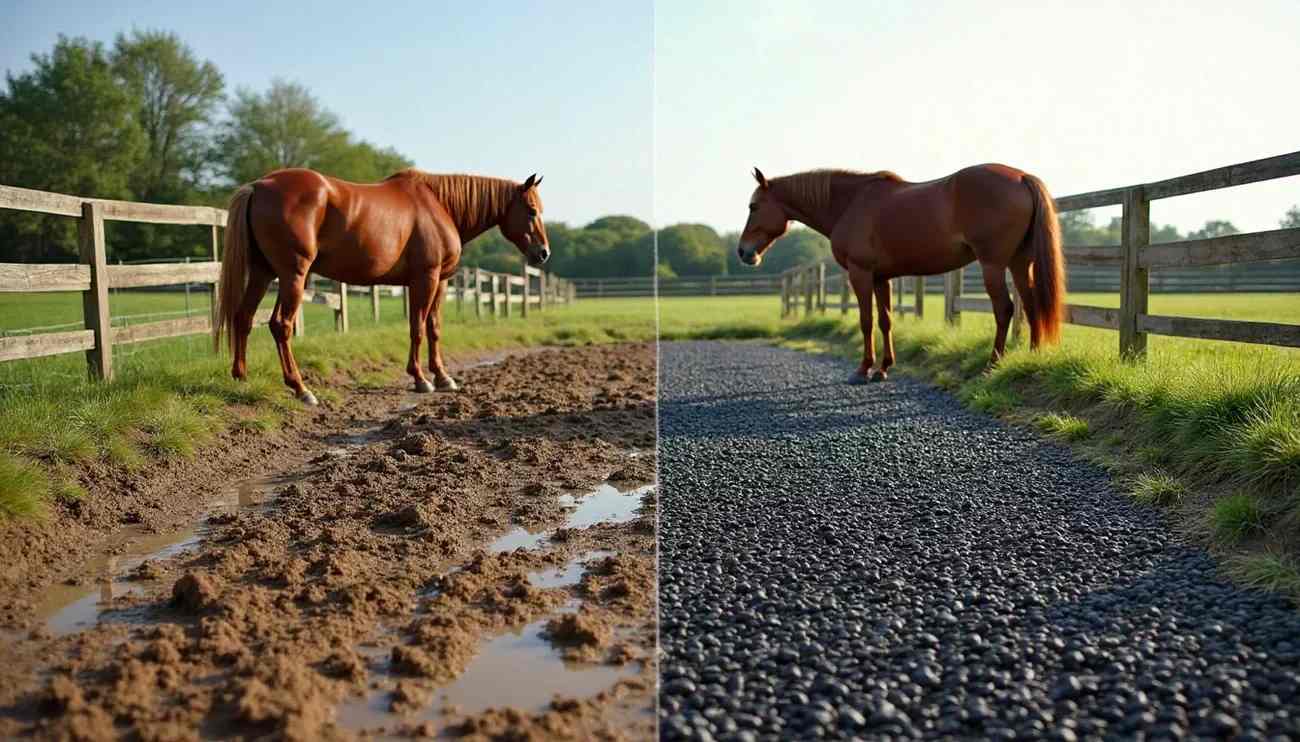
Are you tired of watching your horses trudge through ankle-deep mud every time it rains? Lighthoof installation might be exactly what you need to transform your sloppy, hazardous paddocks into safe, dry areas for your equine companions.
Dealing with mud isn’t just an inconvenience—it’s a genuine health concern for horses. Constant exposure to wet conditions can lead to thrush, scratches, and other painful hoof conditions that might sideline your horse for weeks. Additionally, mud control grids like Lighthoof provide a long-term solution that traditional methods simply can’t match. Unlike temporary fixes, these mud management panels create a stable foundation that allows for proper drainage while supporting both horses and equipment. Furthermore, horse paddock mud control becomes a manageable task rather than a constant battle, making this DIY paddock improvement worth every minute of installation time.
This step-by-step guide will walk you through the entire Lighthoof installation process—from initial planning to final touches—ensuring you have all the information needed to successfully transform your muddy paddock into a functional, comfortable space for your horses. Let’s get started!
Why Lighthoof Is the Right Solution for Muddy Paddocks
Muddy paddocks create significant challenges for horse owners, from hoof health issues to difficult maintenance. Lighthoof offers a unique solution that addresses these problems at their source.
How Lighthoof works
Lighthoof consists of flexible plastic panels made of High Density Polyethylene strips that create a network of interconnected cells [1]. These 3-inch deep cells confine and structure gravel, preventing displacement caused by horses’ hooves [1]. The panels stretch and flex, conforming to unlevel or imperfectly shaped paddocks without cracking or heaving during freeze-thaw cycles [1].
The system works by providing tree-root-like structure to your paddock base, essentially creating a stable foundation that supports both horses and equipment [1]. Once filled with compacted gravel, these cells can sustain tremendous weight—even the largest draft horses, tractors, and farm vehicles [1]. Most importantly, the design prevents mixing of paddock footing with mud underneath, stopping mud formation at its source [2].
Benefits over traditional gravel or mats
In contrast to traditional solutions like loose gravel that require frequent replenishment, Lighthoof provides several distinct advantages:
-
Reduced material needs: Requires only 4-6 inches of gravel compared to 8-34 inches recommended for other grid systems [3]
-
Lower maintenance costs: Prevents annual gravel replacement by holding material in place [1]
-
Superior conformity: Unlike rigid systems, flexes with terrain and can be installed on slopes exceeding 35° [4]
-
Increased safety: No brittle edges or slippery surfaces that could injure horses [3]
-
Environmental benefits: Uses about 1/3 as much plastic as hard grids [3]
A standing 1,250 lb horse exerts approximately 25 PSI on the ground, and a galloping horse up to 500 PSI [4]. Lighthoof is specifically engineered and patented for equine use to handle these extreme pressures [4].
When to consider installing Lighthoof
Consider Lighthoof mud management panels for your DIY paddock improvement particularly when:
-
You have high-traffic areas like gates, feeding stations, or paddock entrances
-
Traditional solutions have failed or require constant maintenance
-
Your property has uneven terrain, slopes, or challenging drainage issues
-
You need a solution that works without extensive site preparation
-
Your horses are suffering from mud-related health problems
Lighthoof is particularly valuable if you’re adding new material every year or constantly digging drainage to manage water [1]. The panels can be installed directly over existing mud without expensive excavation [4], making horse paddock mud control significantly more achievable for the average farm owner.
The system comes with a 10-year limited manufacturer’s warranty [4] and has been successfully used on horse farms for over a decade [4], proving its durability as a long-term mud control solution.
Planning and Preparing Your Paddock
Proper preparation forms the foundation for successful lighthoof installation. Before diving into the actual installation process, you need to carefully assess, measure, and gather all necessary components.
Assessing the mud problem and drainage
Initially, evaluate your property to identify areas prone to excessive mud formation. Observe how water flows during rainfall or snowmelt and note spots where it tends to pool. For optimal drainage, aim for a slope between four and six degrees. This slight incline allows water to flow away naturally without washing out your footing material.
Use Lighthoof in your most severe mud areas. These are the places that take the longest to dry out and leave deep dried mud peaks in their place.
Measuring and marking the installation area
Each Lighthoof panel expands to 6’x12’, covering 72 square feet of ground. To calculate how many panels you’ll need:
-
Measure your problem area’s dimensions
-
Draw the space on graph paper (each square representing a 6’x6’ area, two squares per panel)
-
Shade in where panels will fit, trying different angles first
-
Use as many whole panels as possible before planning cuts
Remember that panels can be trimmed with scissors to fit irregular spaces. You will sacrifice one cell when trimming, making your remaining section that much smaller.
Gathering tools and materials
For each panel, you’ll need:
-
1.5-1.75 cubic yards of appropriate gravel (must be angular crushed stone with fines, 3/8" minus ideal)
-
6-8 oz non-woven geotextile fabric (approximately 72-80 sqft per panel)
-
40 EnviroLock ties (included with panels)
-
Optional border materials (railroad ties, 4x4s, etc.)
Essential tools include sharp scissors, rakes, shovels, 6-12 metal/wood stakes, a hammer or mallet, and a plate compactor (rentable from home improvement stores). Altogether, having these materials ready before starting will ensure your DIY paddock improvement project proceeds smoothly.
Step-by-Step Installation Process
With the proper planning complete, it’s time to get your hands dirty with the actual Lighthoof installation. Following these steps precisely will ensure your mud management system performs effectively for years to come.
1. Clear and level the ground
Unlike traditional solutions requiring extensive excavation, Lighthoof works directly over existing terrain. Simply remove large rocks or debris and temporarily fence animals out of the work area. There’s no need to remove old footing or completely level the ground since the panels are flexible and can lay over roots, smaller rocks, weeds, and uneven terrain.
2. Lay down geotextile fabric (if needed)
Roll out a 6-8 oz non-woven geotextile fabric over the existing surface. This creates a crucial barrier between the panels and mud below. For optimal results, overlap the fabric edges by approximately 18 inches to prevent shifting and ensure complete coverage.
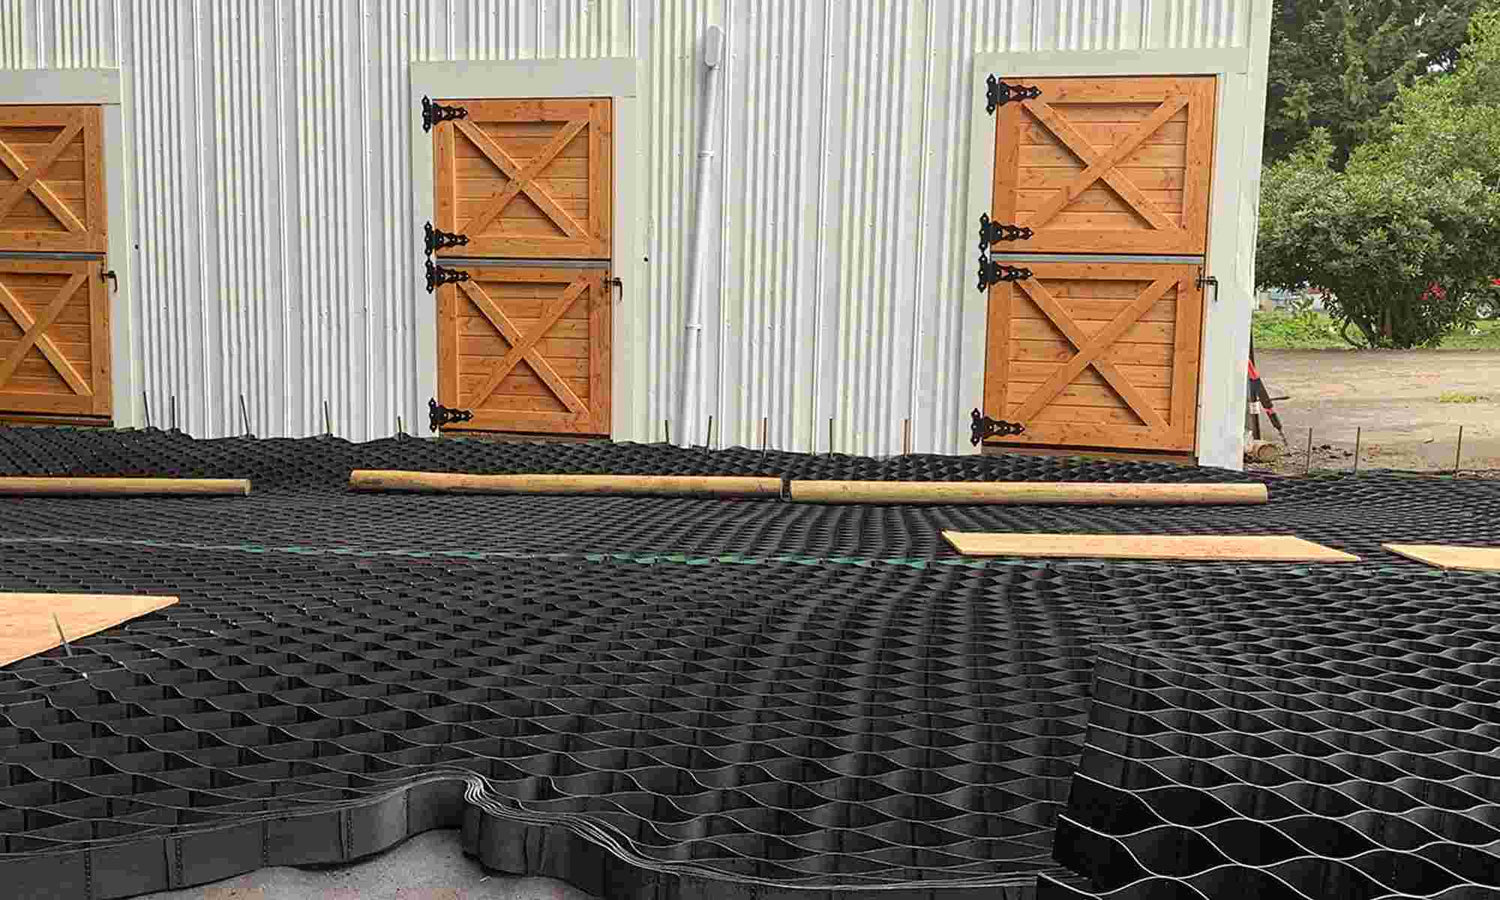
3. Unroll and position Lighthoof panels
Cut the ties keeping your panel folded and open it fully. Pre-stretch the panel by playing a brief “tug-of-war” with it. Place on the ground and ensure all cells are fully expanded to their diamond pattern. Panels can be easily trimmed with scissors for irregular spaces.
4. Anchor panels and connect edges
Secure one end with 4-8 metal or wood stakes driven deeply into the ground. Pull the opposite end as far as possible to open all cells, then stake that end as well. For multiple panels, use the included EnviroLock ties to fasten them together by wrapping around edge cells where panels meet.
5. Fill panels with appropriate material
Pour angular crushed stone (⅜" minus with fines is ideal) into each cell. Never use pea gravel, drain rock, or rounded stones as these won’t compact properly. Add 1-2 inches of extra gravel above the cell tops to allow for settling during compaction.
6. Compact and level the surface
Once all panels are filled, thoroughly compact the gravel using a plate compactor (rentable from home improvement stores). First, moisten the gravel for better compaction by spraying it with a hose. Subsequently, run the compactor slowly over every inch, including edges. Add more gravel wherever cell tops become exposed, then compact again.
Post-Installation Care and Maintenance
Maintaining your Lighthoof system properly ensures it will provide years of reliable mud control for your horse paddock. After completing your DIY paddock improvement project, a little regular maintenance goes a long way toward keeping it looking brand new.
Daily and seasonal checks
Proper manure management forms the cornerstone of Lighthoof maintenance. Remove manure from your paddock area at least weekly, though daily cleaning is strongly recommended [5]. Manure left to decompose creates a layer of bacteria-rich organic matter that turns into mud and harbors parasites [6].
For seasonal care, check areas for thinning of the top surface and top off if needed. If you live in regions where winter manure removal is challenging, perform a gentle surface scrape in spring [5]. Be careful not to dig deeply into the installation to avoid catching the flexible panels.
How to fix minor issues
If gravel settles over time, simply add more of the same 3/8" minus crushed stone and recompact to maintain proper levels [5]. This typically becomes necessary every couple of years with a properly compacted initial installation. For exposed panel edges, secure them using sheet metal roofing screws to affix cells to border timbers [7].
Should water pool on your installation, remember this isn’t a failure - Lighthoof provides a firm surface even underwater [7]. Consequently, consider drainage solutions around your installation rather than modifying the panels themselves.
Tips to extend panel life
Above all, regular mucking significantly extends the life of your gravel investment [8]. The panels create a firm, easily maintained surface that supports maintenance equipment like ATVs or tractors [6].
If you need to add more gravel, use the same type originally installed for consistency. After installation, avoid attempts to relocate panels, as they aren’t designed to be moved [5]. However, if absolutely necessary, start at one end and gently lift while shaking out the gravel rather than dragging with machinery, which will tear the material.
For paddocks with horses that dig, monitor their behavior closely, as this activity can potentially cause wear to the top edge of the panels over time [9]. Generally, proper installation with thorough compaction helps minimize this risk. Additionally, digging horses tend to be most curious right when the panels are first installed and then leave them alone once they realize how unsatisfying it is. A small piece of rubber mat or a large rock temporarily in their favorite digging spot will deter them and save you from having to cover your panels back up over and over again.
Conclusion
Lighthoof mud management panels offer a practical, long-lasting solution for horse owners battling persistent paddock mud problems. Throughout this guide, we’ve explored how these flexible HDPE panels create a stable foundation that prevents mud formation at its source while allowing proper drainage. Most importantly, this system protects your horses from harmful mud-related hoof conditions that could sideline them for weeks.
The installation process, while requiring some initial effort, remains significantly simpler than traditional methods. Unlike conventional approaches demanding extensive excavation, Lighthoof works directly over existing terrain with minimal ground preparation. Additionally, the system requires less material overall—just 4-6 inches of angular crushed stone compared to the 8-34 inches needed for other grid systems.
Regular maintenance after installation ensures your mud control investment lasts for years. Therefore, establish a consistent manure removal routine and check for settled gravel periodically. The panels’ durability, backed by a 10-year warranty, means your once-muddy paddock can remain functional and comfortable through changing seasons.
Consider the long-term benefits when evaluating this DIY paddock improvement. The initial time investment transforms into years of reduced labor, healthier horses, and a more manageable farm environment. After all, effective horse paddock mud control shouldn’t require constant attention or repeated expenses.
Your horses deserve a safe, dry place to live and move. Lighthoof provides exactly that—a proven solution that addresses mud problems at their core rather than temporarily masking symptoms. The combination of proper installation and regular maintenance will certainly reward you with drier paddocks and happier, healthier horses for years to come.
References
[1] - https://www.lighthoof.com/pages/how-it-works
[2] - https://www.lighthoof.com/blogs/blog/complete-guide-horse-paddock-footing
[3] - https://www.lighthoof.com/pages/lighthoof-benefits
[4] - https://www.lighthoof.com/pages/the-lighthoof-difference
[5] - https://www.lighthoof.com/pages/frequently-asked-questions
[6] - https://www.lighthoof.com/blogs/blog/fixing-horses-mud-problem
[7] - https://www.lighthoof.com/blogs/blog/how-not-to-fail-at-fixing-your-paddock-mud
[8] - https://www.lighthoof.com/blogs/blog/gravel-horse-paddock-last-longer
[9] - https://forum.chronofhorse.com/t/lighthoof-equine-mud-management/401642

Leave a comment
This site is protected by hCaptcha and the hCaptcha Privacy Policy and Terms of Service apply.